
Today, I’m showing you my step-by-step process for creating a lined paper template for bookbinding. You see, there are very few (if any) commercial printers willing to provide lined paper in a format wide enough to fold down into signatures. To get around this, I taught myself how to create templates using Adobe InDesign. Now, with just a few adjustments, I can print lined paper in any size as often as I need to. If you want to learn how, keep on reading.
My approach
I use Adobe InDesign to create my templates because InDesign is used to organize text and other content for catalogs, books, portfolios and more. It’s very straight-forward and easy to use, especially the tables feature, but you can use any word publishing software you like.
Page layout
Before getting started, I researched one of my commercial A5 journals and took some measurements. It’s important to understand what a standard height and width are for journals, because these sizes are common and fit well in the owner’s hands.
I personally like a larger journal, so I chose A5. Once you’ve chosen your size, grab a comparable book and inspect the margins, lines (dots, or even grids) and take a few measurements. Almost all signatures need about 1/2″ worth of gutter space between them to allow a fold and sewing.
Here is what I ended up with after making a couple of adjustments (I want my journals to be slightly unique, so they’re a little bit bigger than A5):
Page height: 8.25”
Page width: 5.625”
Line width: 5.0”
Line height: 0.27”
Top margin: 0.5”
Bottom margin: 0.5”
Page settings
Once you’ve taken some measurements, it’s time to translate them onto a foldable signature. To do this, I grabbed a sheet of paper in the desired size and folded it in half. Then, I used a ruler to mark the margins and sketch some lines into place. As a visual learner, this helps me recreate the page before I sit down in front of the computer.
Tip: when sketching on a sheet of paper, be sure to consider space for folding and where you might need to trim the paper to fit.
Using tables to create lines
Tables are the most effective way to create lines, because the rows can be adjusted to any height or width. The rows can also be tinted (called a “stroke”), which gives the lines their visual element.
Most word publishing software (Microsoft Word, Adobe InDesign, Apple Pages) have a table creation feature. Inside the table settings, you can adjust all sorts of dimensions and add row strokes, table borders and more. If you’re familiar with Excel, you can use that program to make these, too!
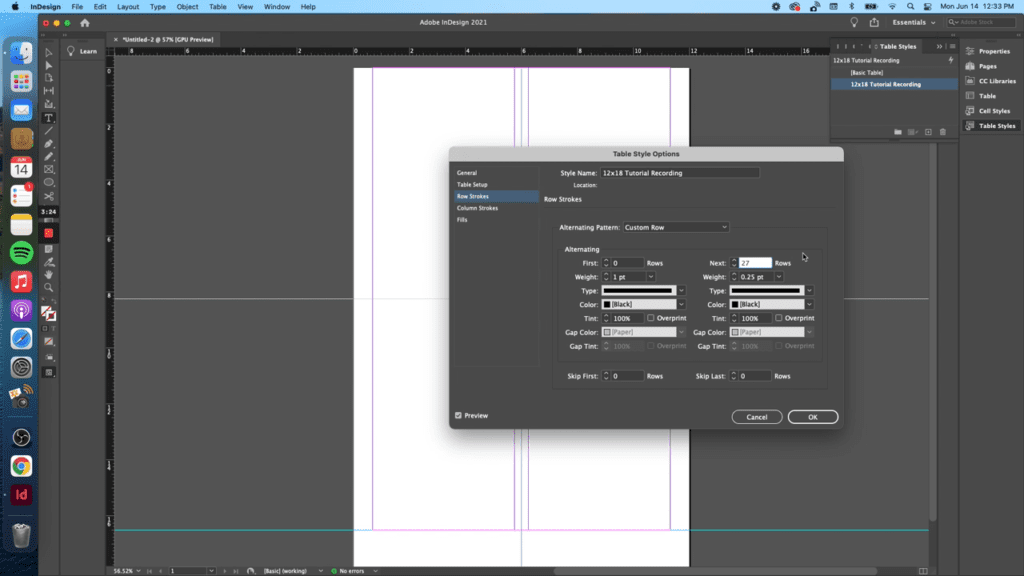
Adobe InDesign has a “table style” feature, which lets me create a style that can be “painted” on any table – regardless of size. Inside the style creator, I set my preferences for row stroke thickness and color. Now, I can create any size table and it will respect my color choices per the style.
Creating tables
After creating the table style, it’s time to create the table itself. To do this, you’ll go to Table > Create table and enter the number of columns, rows, headers and footers necessary. I create one table for each page, so my tables only require 1 column and, therefore, 1 header. For the rows, I start with an educated guess – usually 15 or 20 – and add or subtract as needed to fit the desired space.
Recreating the page itself
Next, I set the height of the header row to be 1/2.” This gives the top of the page enough room for a date, entry title or anything else someone might want to write before journaling. Since it’s a “header” row, the stroke line is naturally darker than the rest of the lines, so it stands out against the rest of the page.
My template lines are set to a height equal to 0.27″ each. It took some trial and error to figure this out, because I wanted enough room to write in cursive, print or another language. A little more than 1/4″ was perfect, but you can choose any size that works for you. Go super small or super big, whatever you like.
Finally, I gave the last row of the table a height of 1/2″. This creates a margin at the bottom that matches the top, but without a thicker line (this one is a regular line, not a header).
Rinse and repeat
Once the first table is created, it’s as simple as copy/paste! I will copy the table four times – top left, top right, bottom left and bottom right. I do this for all of my templates. Now, if you can only get one signature from a single sheet (hint: 8-1/2×11), then you would only copy and paste once.
Printing
I have a Canon Pixma Pro-100, which is capable of printing wide paper. If you don’t have a printer that can do this, export your template as a PDF (all word publishing tools can do this today), load it on a thumb drive and take it to any big box office supply store (Office Max, Office Depot, Staples, etc.). Make sure you bring your paper and ask them to print it for you on one of their wide-format printers. The cost is usually a few cents per sheet, which is less than the cost to buy ink for my printer! ?
Size-specific Lined Paper Template Tutorials
- How to Make a Ledger Size Lined Paper Template (11×17) – the first template I ever created. This one will get you two signatures just slightly smaller than A5 size by 3/10 of an inch.
- How to Make a 12×18 Lined Paper Template – this is the template I personally use, because I can get two A5 signatures from each sheet. With some modifications, you could probably get three A6 signatures.
- How to Make a Letter Size Lined Paper Template (8×11) – this template will yield one A6 signature (4 pages) and uses the most commonly available size on the market.
Hope you found this helpful!
More bookbinding goodness
✨ What tools do I need to get started bookbinding?
- Bookbinding Tools & Supplies Quick Start Guide – learn all about book making tools, which to buy first & where to go online
- Pick up my popular Complete Starter Bookbinding Tools Kit – all the bookbinding essentials in one spot
🌟 Looking for a simple way to start making books?
Try a Complete Book Materials Kit. Each one has everything you need (+ tutorials & videos) to make a beautiful book without all the fuss.
Thank you for taking me along on your book making journey!
Misty


