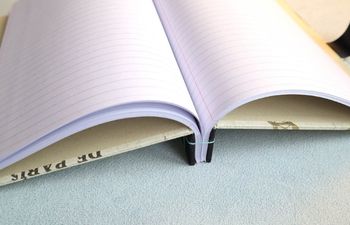
Do you need a new notebook (on a budget), by chance? In this tutorial, I’m going to show you how to make a stab bound book (or notebook) using loose leaf paper. Yup, that’s right! This book is made with good ol’ college ruled filler paper. I recommend paper with a reinforced edge for extra strength.
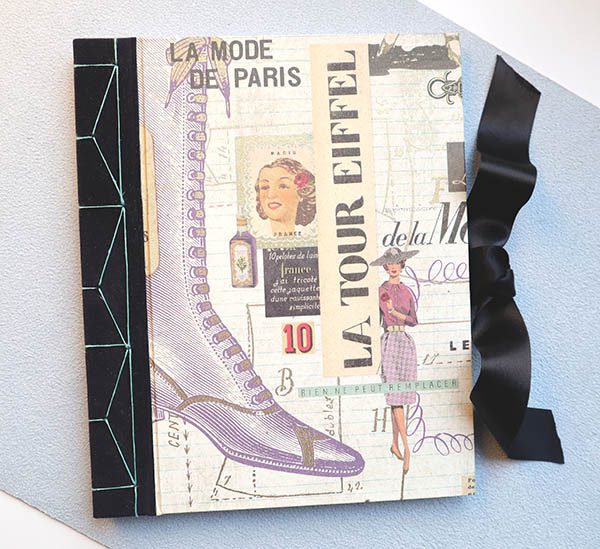
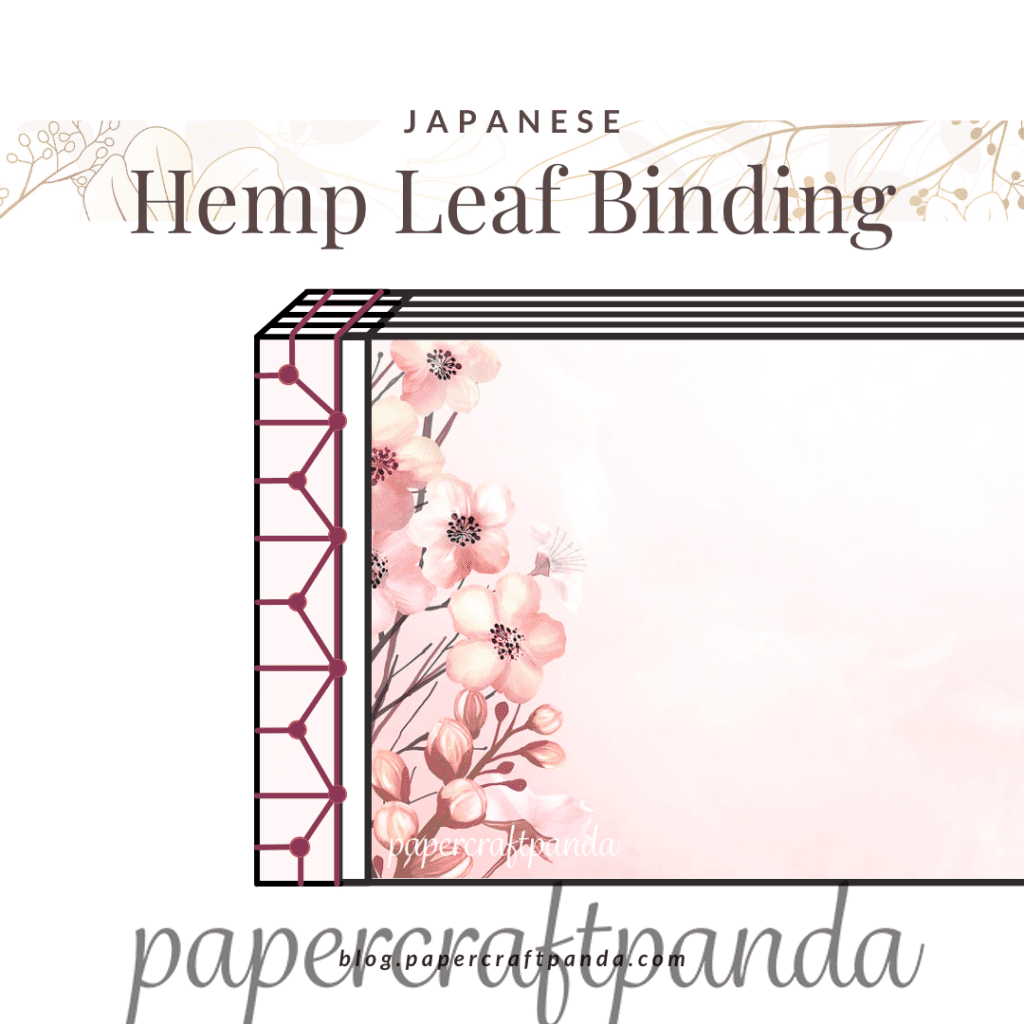
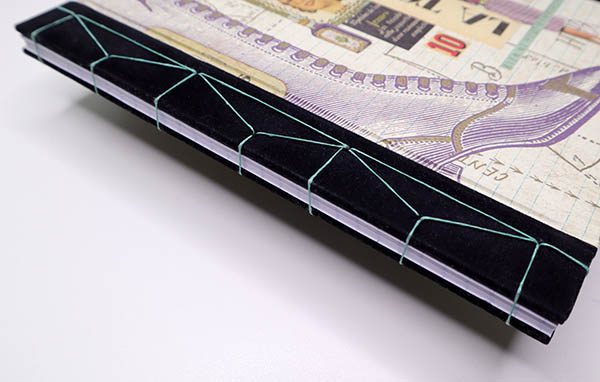
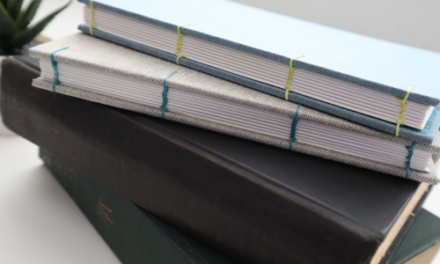
The final notebook is 8-1/2″ tall and 7″ wide (almost square). It’s bound using the Japanese Stab Binding method, which is perfect for a book of this shape and size. To add character, the spine is sewn with the Hemp Leaf binding pattern using 3-ply waxed linen thread. I’ll share more about the materials I chose (and why) below along with a few extra tips to help you customize this for your own needs.
Bookbinding Tutorial: Stab Bound Notebook with Loose Leaf Paper
Measurements: 8-1/2″h x 7″w
Cost Level: $
Skill Level: Beginner
Total Time: 120 minutes + drying time
Quick Menu:
- Choosing & preparing materials
- Create the front & back covers
- Pierce the sewing stations
- Sew the book using a Hemp Leaf binding pattern
- Jump to Video Tutorial
Choosing materials for a stab bound book
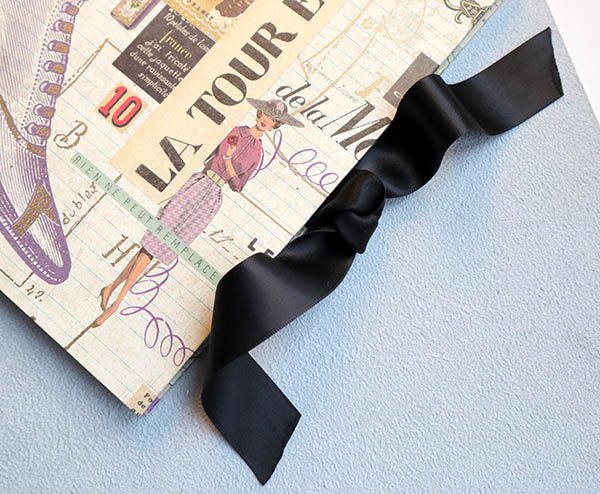
I’m a huge fan of vintage fashion and early 20th century Paris. To me, Paris represents classic luxury and style. To create the look, I chose these materials:
- black velvet flocked Laval book cloth
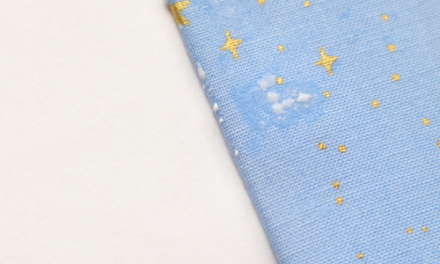
- Florentine print on ivory laid paper
- 110 gsm ivory end papers
- 3-ply waxed linen thread in a light green color
- 1 inch wide black double satin ribbon
Velvet flocked (velour) Laval book cloth
Laval book cloth is just like it sounds – rich, luxurious and soft with a mottled texture. The back is laminated to provide extra strength and water resistance. It’s easy to fold and takes adhesives well.
Florentine print on ivory laid paper
Printed in Italy on ivory laid paper, this print features stunning images of Paris from the early 1900’s and weighs in at 105 gsm.
Satin ribbon
To add a touch of lux femininity, I created a bow closure out of 1″ black satin ribbon.
I’ve linked these papers below under Resources. Now, let’s get into the tutorial!
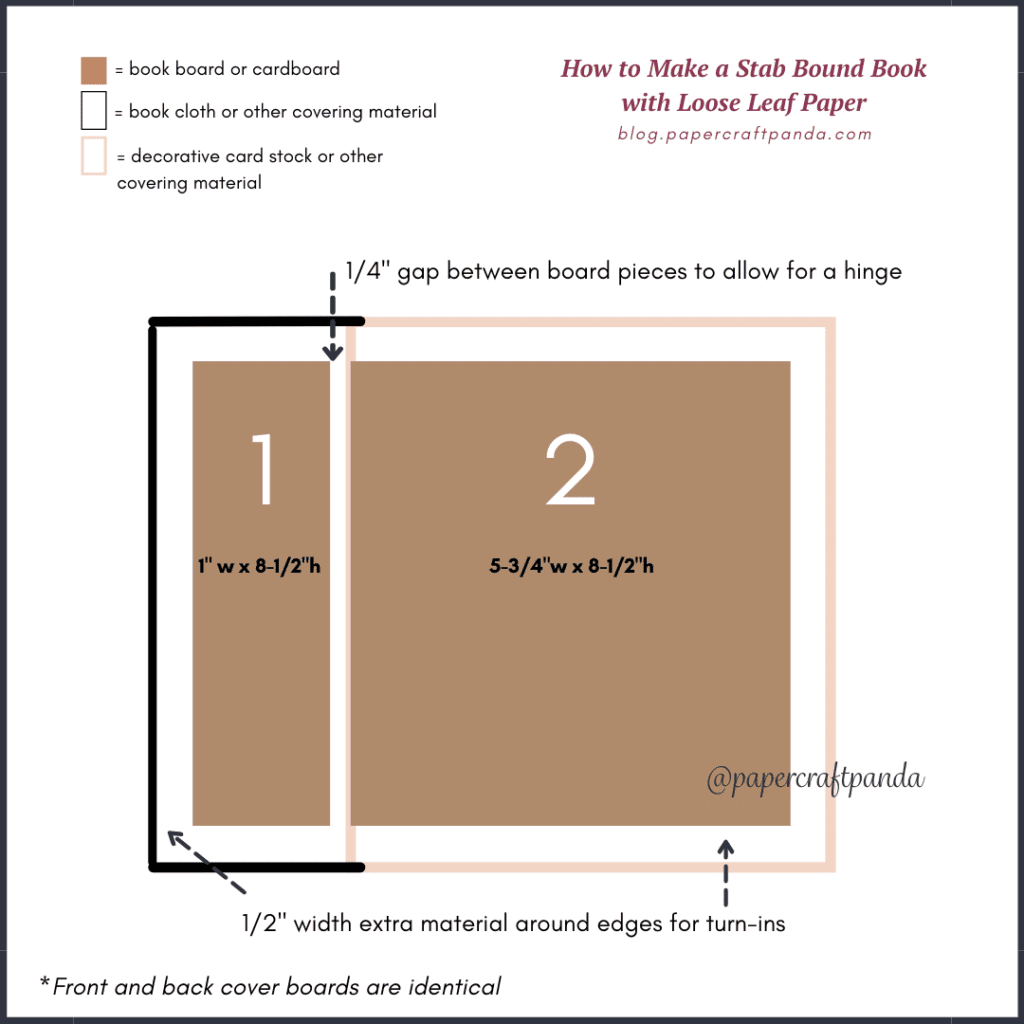
Stab Bound book Materials:
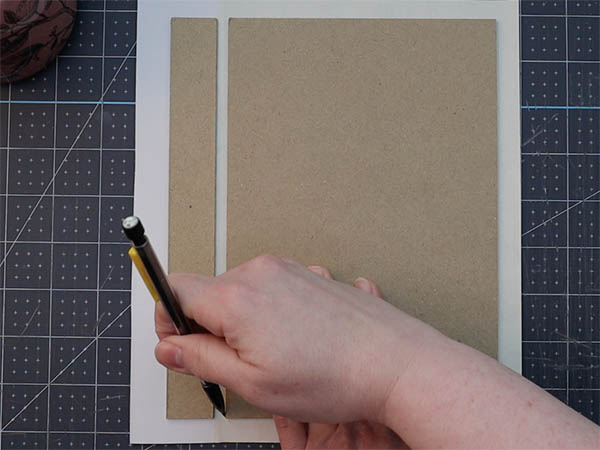
- 1 sheet of covering material for the front and back covers cut into two pieces, 9-1/2″h x 6-1/2″w
- 1 piece cover material for the hinges, each cut to 9-1/2″h x 1-3/4″w
- 2 sheets of decorative card stock or fine paper, each cut to 8-1/2″h x 6-3/4″w
- book board
- 2 pieces for the hinges, each cut to 8-1/2″h x 1″w
- 2 sheets for the front and back covers, each cut to 8-1/2″h x 5-3/4″w
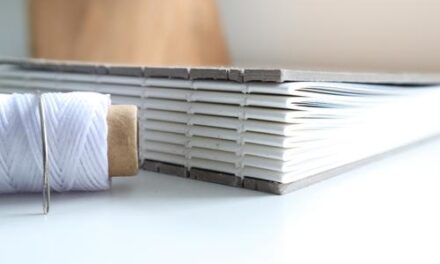
- 51 sheets college ruled reinforced loose leaf filler paper
- 60″ waxed linen thread, any color
- PVA or Elmer’s glue
- Ribbon, stickers, twine, etc. to decorate if desired

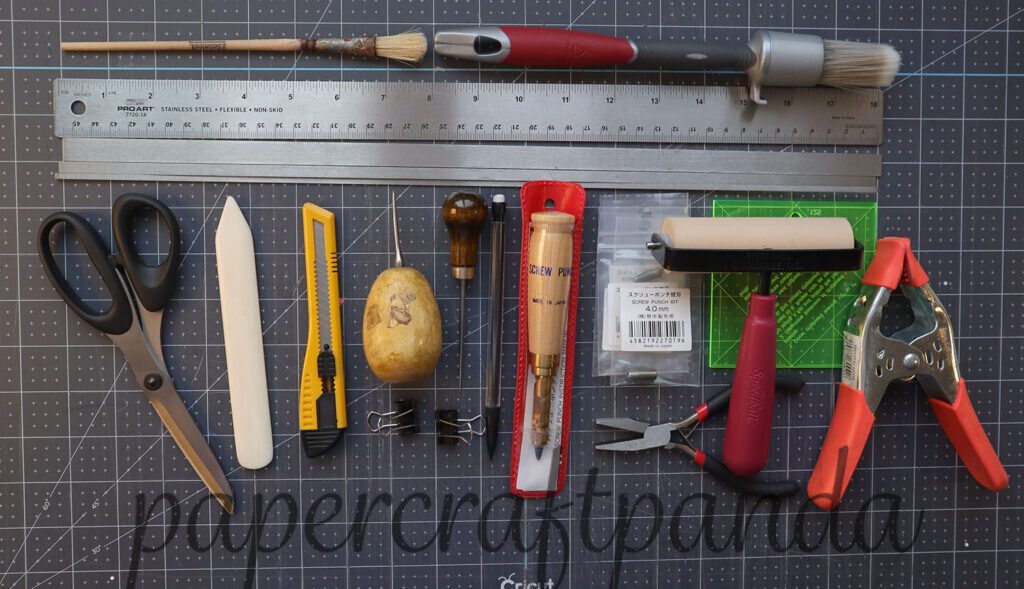
Tools & Supplies:
- Bone folder
- Olfa knife
- Japanese Screw Punch with 3mm tip or 1/8″ hole punch
- Heavy duty awl
- 6″ light duty tapered awl
- Scissors
- 12-18” ruler
- 1 large & 1 small paste brushes (or glue sticks)
- clamps or two 3/4″ binder clips
- pencil
- several sheets of waste paper
- Optional: Corner jig, steel spacers, pliers
Starting at the “end”
Here is an illustration of how each of the materials listed above will come together to create the book in this tutorial. The front and back covers are created using the exact same steps. If the covering material has an image or pattern, be sure to invert it for the back cover. If the image is not inverted, it will be upside down (yikes)!
Part I: Piercing the sewing stations
Piercing the sewing stations involves three main steps:
- Creating the sewing station template
- Piercing holes in your paper
- Piercing holes in the covers
Steps:
Cut paper to size
- Cut all sheets of paper to a size of 8-1/2″h x 6-7/8″w. For my book, I chose 51 sheets of college ruled, reinforced loose leaf paper
- Reserve one sheet of paper for the sewing template
Create a sewing station template for the Hemp Leaf binding pattern
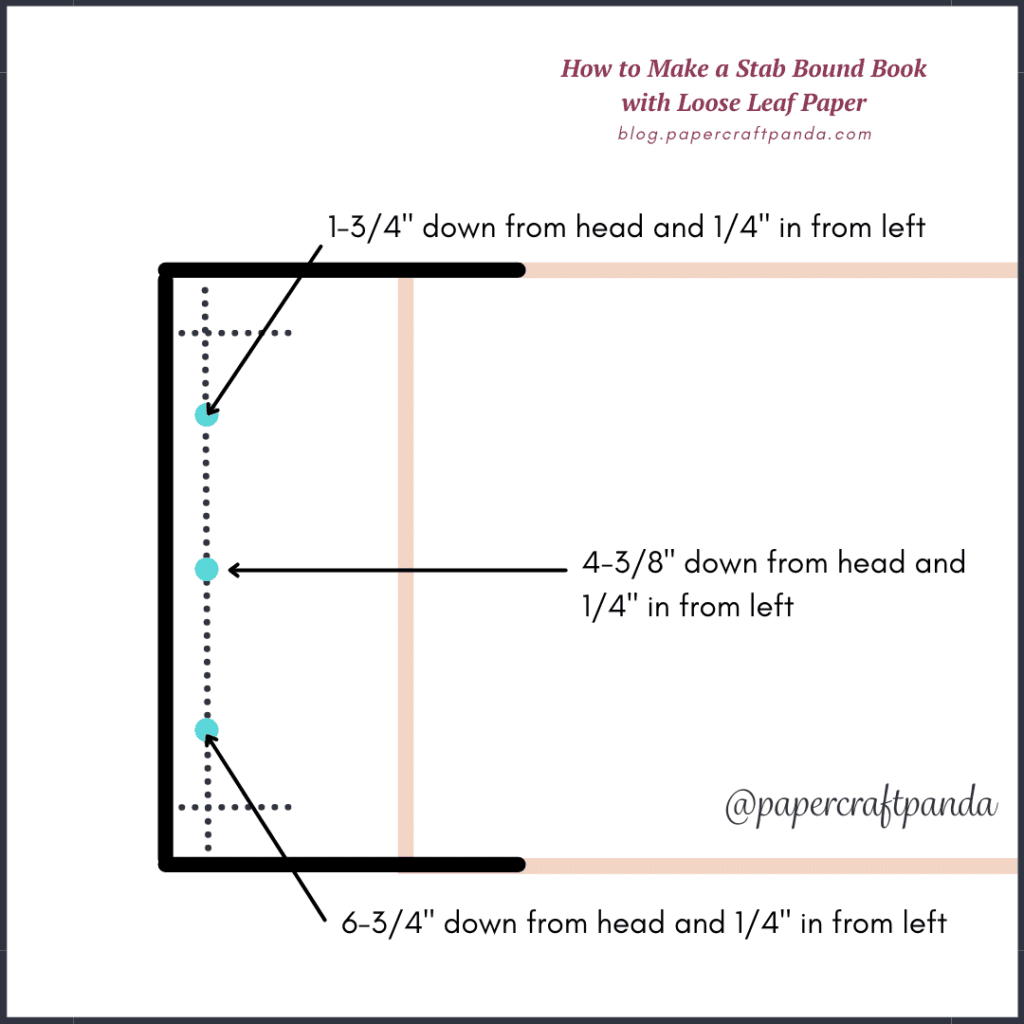
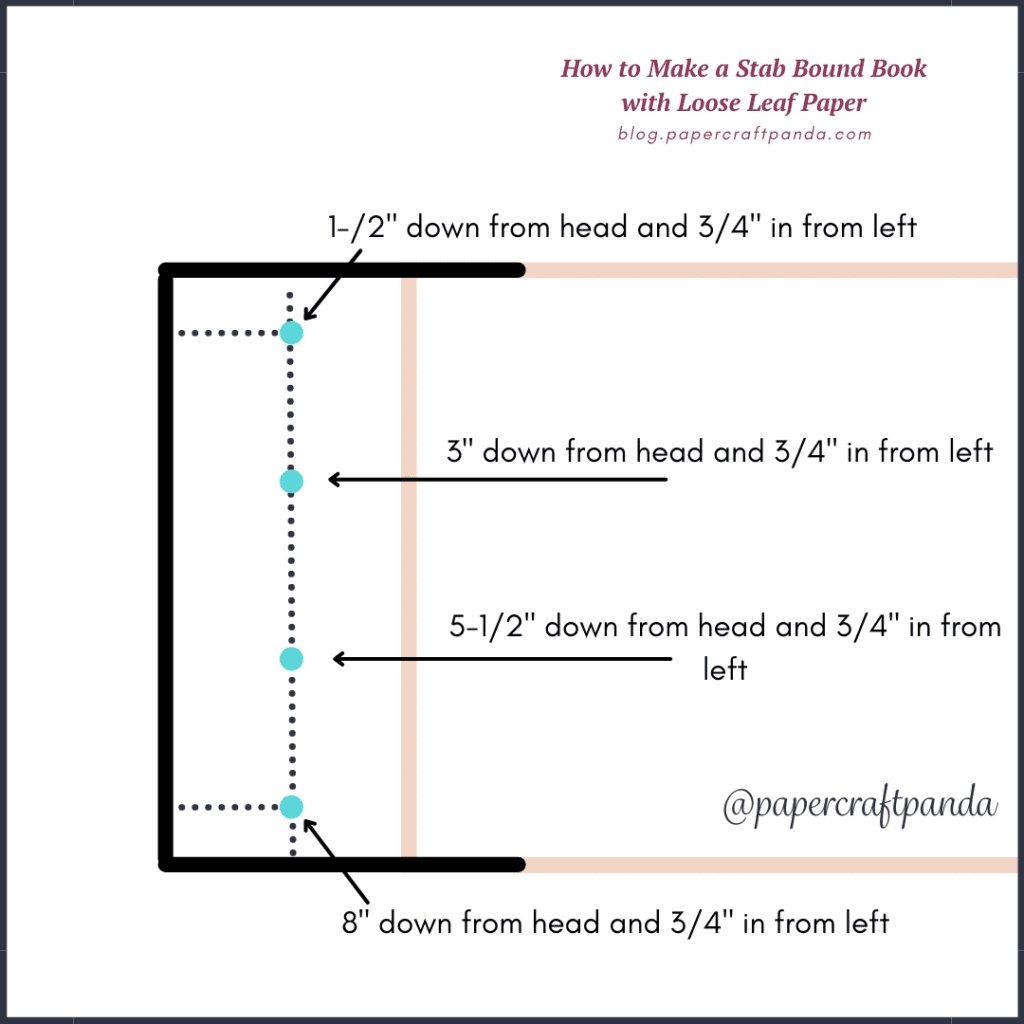
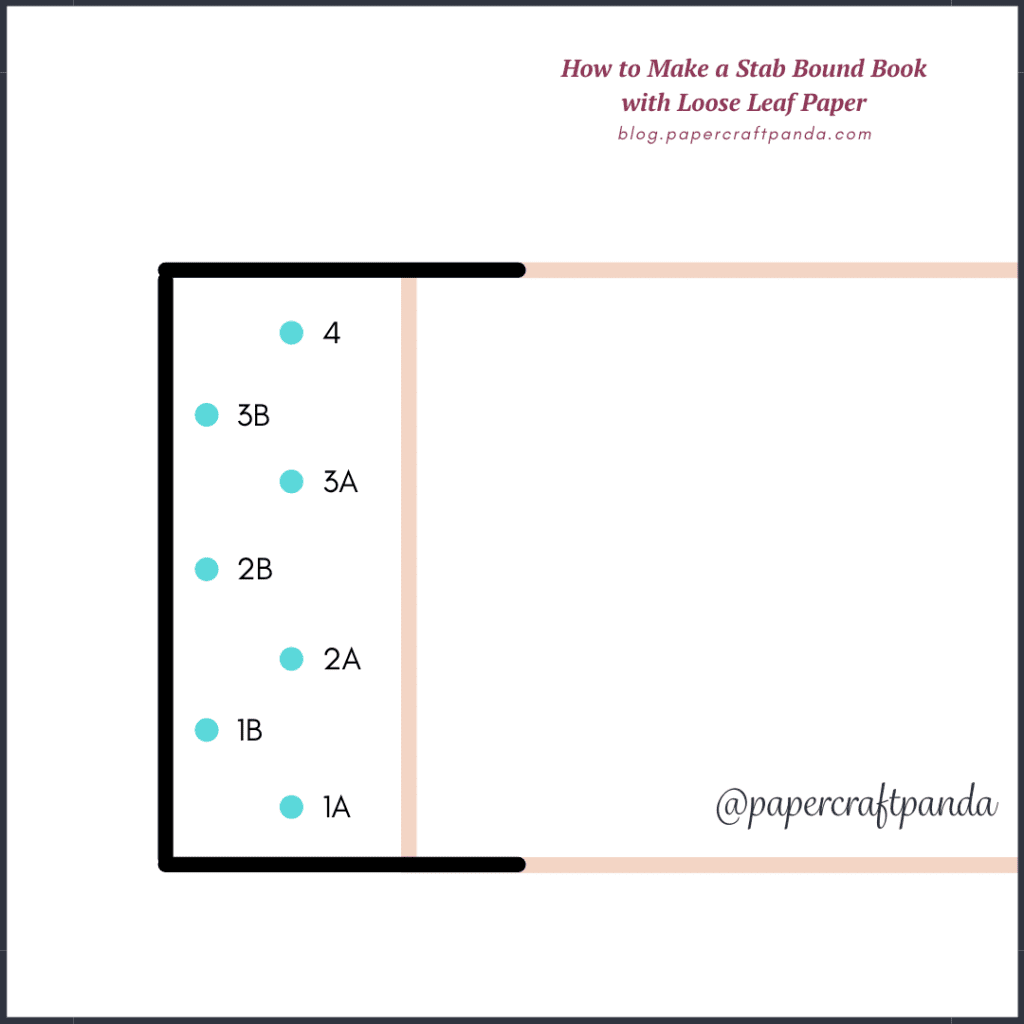
- Place a mark in each of these locations on the reserved sheet. My measurements start at the head (top of the book) and end at the tail (bottom of the book).
- 1A: 8″ down from head, 3/4″ in from spine
- 1B: 6-3/4″ down from head, 1/4″ in from spine
- 2A: 5-1/2″ down from head, 3/4″ in from spine
- 2B: 4-3/8″ down from head, 1/4″ in from spine
- 3A: 3″ down from head, 3/4″ in from spine
- 3B: 1-3/4″ down from head, 1/4″ in from spine
- 4A: 1/2″ down from head, 3/4″ in from spine
- Pierce each station with a Japanese screw punch or regular hole punch
Here are two diagrams I’ve created to show you the position of my sewing stations.
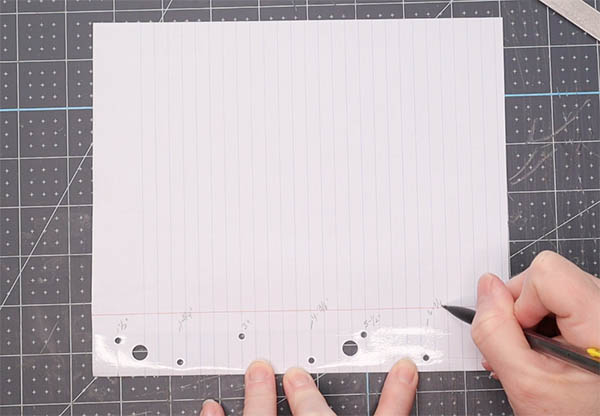
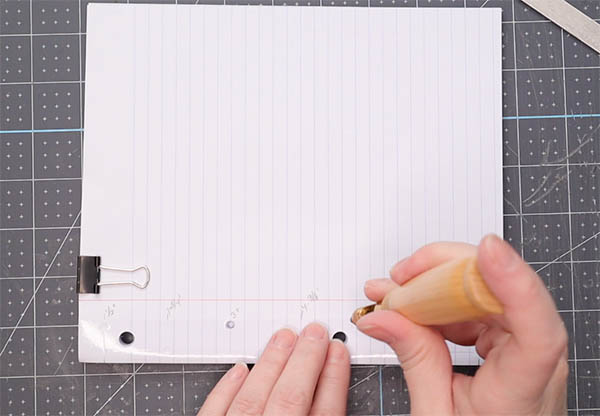
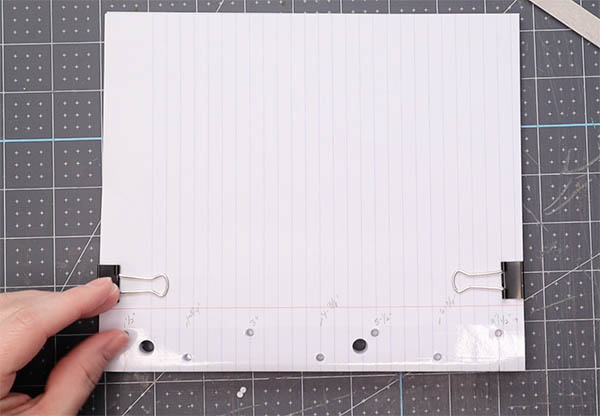
Transfer the sewing station locations to the paper using the new template
- Stack the paper so the spine edge is flush
- Lay the template on top of the stack and clamp it in place using binder clips
- Pierce each sewing station with a Japanese screw punch or regular hole punch. Thicker paper might require you to pierce 3-5 sheets at a time.
Part II
Create the front & back covers:
Both covers are created the same way. Each book will need the following from your materials stash:
- one small hinge board, sized 9-1/2″h x 1-3/4″w
- a large board, sized 8-1/2″h x 5-3/4″w
- one large piece of covering material, sized 9-1/2″h x 6-1/2″w
- a small piece of covering material, sized 9-1/2″h x 1-3/4″w
- 1 sheet decorative card stock or fine paper, sized 8-1/2″h x 6-3/4″w
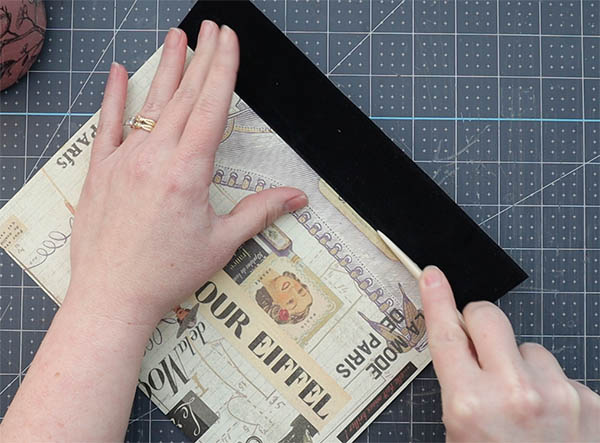
Arrange the papers & glue down the boards
- Lay the small piece of covering material face up on the work surface
- Apply a thin line of PVA to the right edge of the material
- Glue the large piece of material to the right edge. The two pieces should overlap each other by 1/8″
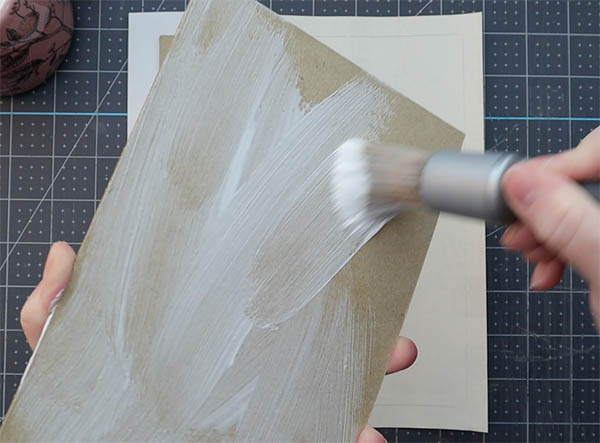
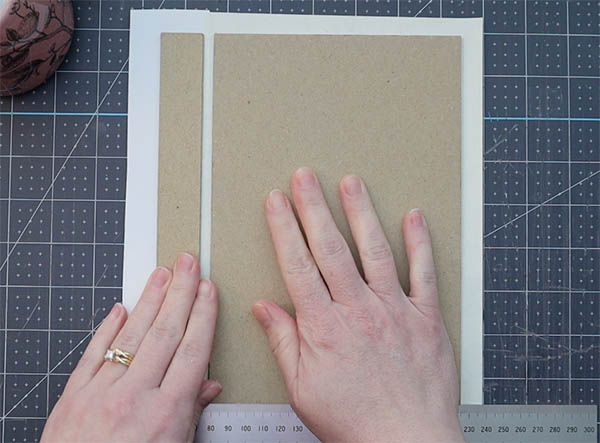
- Apply PVA to the back of the small piece of board. Glue the board down on the small piece of covering material. Center it with 1/2″ on the top, left and bottom sides. Press with a bone folder to remove air bubbles
- Apply PVA to the back of the large piece of board. Lay this board glue-side down roughly 1/4″ to the right of the small piece of board. Be sure the two boards are level in height with each other. Press with a bone folder to remove air bubbles
- Turn the full piece over and cut away any excess material (there should be 1/2″ around each edge of the board)
- Turn the full piece face down. Using a bone folder, gently define the hinge
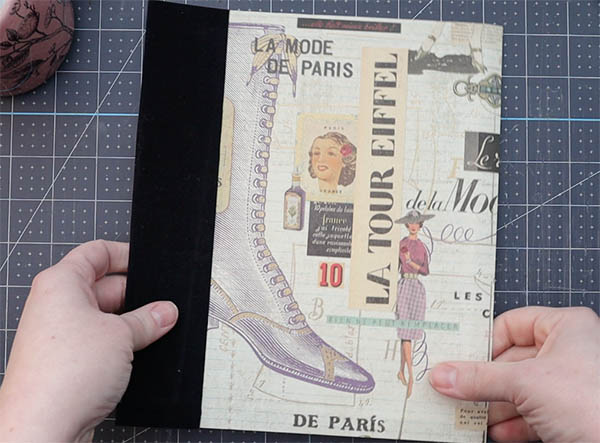
Turn in the edges & create corners
- Flip the covering material back over on the work surface
- Mark and cut the four corners. If you need help with this, I have technical videos in my Casebinding tutorial that can help.
- Glue the top and bottom flaps first, using care to smooth each flap with a bone folder
- Glue the right and left flaps next, repeating the smoothing process as you go along. Use care to turn in each corner with the pointed end of your bone folder
- Press the cover under several large books for 15-20 minutes. Be sure to sandwich the cover between two sheets of waste paper (regular printer paper works here), which will absorb extra moisture
- Lay the cover face-down on a work surface with the board facing up
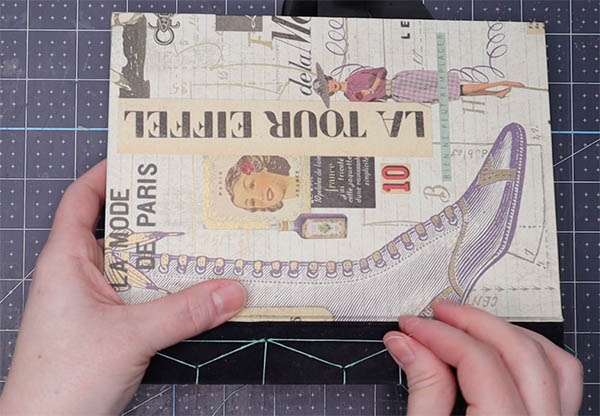
- Optional: If you’re creating a closure like mine, go ahead and attach one piece of ribbon to the cover now. The second piece of ribbon will go on the back cover. Both pieces of ribbon should be the same length.
Apply the end papers
- Apply a layer of PVA to the back of one piece of decorative card stock sized 8-1/2″h x 6-3/4″w
- Lay the card stock glue-side down on the board. Center the board with 1/8″ edge on each side. Use a bone folder to remove any excess air bubbles
- Place the cover under weight to dry for 30 minutes
- Repeat all steps in the same order for the back cover
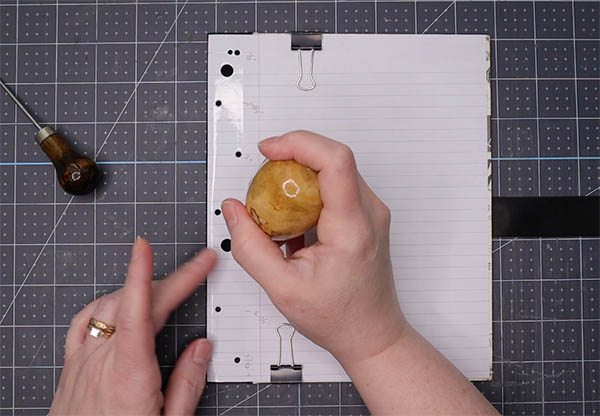
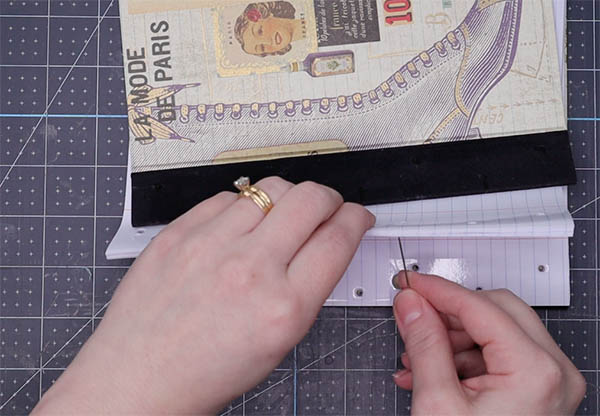
Pierce the back & front cover sewing stations
- Lay the template you’ve created on top of the front board
- Clamp the template to the board using two binder clips or clamps
- Pierce each sewing station position with a heavy duty awl
- Define each hole using a 6″ light duty tapered awl. The threaded needle should glide through
- Remove the clips or clamps and set the template aside
- Turn the back cover over so it is face-down on the work surface
- Sandwich the front and back covers (it should look like a finished book, but without paper)
- Clamp the front board to the back board. We’re going to use the front board as a piercing template for the back
- Repeat steps 3-4
- Remove the clamps and set the boards aside
Part III: Sew the book using a Hemp Leaf binding pattern
The Hemp Leaf binding pattern has 7 sewing stations. Larger books may have more. Here is what it looks like:
Steps:
- Combine the back cover, paper stack and front cover to resemble a finished book
- Separate the book into two halves
- Thread the needle
- Sew the Hemp Leaf binding pattern
Here is an illustration showing the position of each sewing station as reference for the steps below:
Steps to sew the Hemp Leaf binding pattern:
- Starting at the middle of the book, move the needle into station 2A
- Pull the thread, leaving 3-4″ on the inside of the book
- Wrap around the spine to the back cover
- Go through station 2A to the front
- Go into station 2B to the back
- Wrap around the spine to the front
- Go back through 2B again
- Now go through 2A from back to front
- Move into station 3A to back
- Go through 2B to the front
- Move through 3A to the back
- Go through 2B to the front
- Go through 3A to the back
- Wrap around spine
- Go through 3A to the back
- Go through 3B to the front
- Wrap around the spine to the back of the book
- Go through 3B to the front
- Go through 3A to the back
- Go through 4 to the front
- Go through 3B to the back
- Go through 4 to the front
- Wrap around the head to the back
- Move through 4 to the front
- Go through 3A to the back
- Go through 2A to the front
- Go through 1B
- Wrap around the spine to the front cover and go down through 1B again
- Go through 2A to the front
- Go through 1A to the back
- Wrap around the spine to the front
- Go through 1A to the back again
- Go through 1B to the front
- Go through 1A to the back
- Wrap around the tail to the front cover
- Go through 1A to the back again
- Open the book at it’s center and find the 3-4″ tail of thread
- Hold the book open at the mid point with one hand. Use your free hand to angle the needle into station 2A. It should slide between the pages and alongside the tail of thread
- Tie a square knot & cut away the excess thread (leaving about 1/2-3/4″)
- Hide the threads inside the gutter
Add some finishing touches
The book is finished! Feel free to add some of your own style and personality to the cover, spine or both. I skipped the extras and included a wide black satin bow closure to compliment the hemp leaf pattern. I believe it helps to balance the eye as it moves from the beautiful pattern to the fore edge of the book. What do you think?


Video: How to Make a Stab Bound Book with Loose Leaf Paper
More bookbinding goodness
✨ What tools do I need to get started bookbinding?
- Bookbinding Tools & Supplies Quick Start Guide – learn all about book making tools, which to buy first & where to go online
- Pick up my popular Complete Starter Bookbinding Tools Kit – all the bookbinding essentials in one spot
🌟 Looking for a simple way to start making books?
Try a Complete Book Materials Kit. Each one has everything you need (+ tutorials & videos) to make a beautiful book without all the fuss.
Thank you for taking me along on your book making journey!
Misty


