The Perfect binding method is an extremely beginner-friendly technique that binds paper using a flexible adhesive at the spine. It was invented in 1895, but wasn’t used in book manufacturing until the 1930’s to enable the mass production of paperback (also known as softcover) books.
This method is well-known for several reasons:
- The simplicity is perfect for beginner-level bookbinders
- It’s a great option for binding single sheets of paper
- It doesn’t require a hardcover
- It’s still the #1 publishing method in the industry
As you can see, there is more to the Perfect binding than meets the eye. Now, let’s jump into the details.
What is a Perfect binding?
- Bookbinding Method or Technique: Perfect binding
- Minimum Skill Level: Beginner
- Characteristics: Flexible, softcovers, closed spine, will not lay flat, adhesive type is important
- Great for: Single sheet bindings, newer book makers, magazines, authors, notepads
- Bad for: hardcover books, scrapbooks, photo albums and any books that need to lay perfectly flat
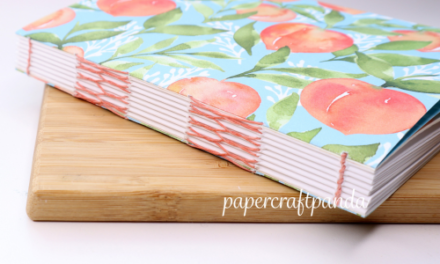
Characteristics of a Perfect binding
Perfect bindings are noted for their flexibility, softcovers and rectangular spines. The book block is historically square at the spine, top and bottom edges and does not feature an overhang on the fore edge. If the book has folded sheets, the folds are removed before glue is applied.
As you may have guessed, adhesives play a very important role in the perfect binding. It should be strong, dry clear and remain flexible over time.
Are perfect bindings inferior to other binding methods?
I get this question a lot, and the short answer is this: No.
While perfect bindings do have some drawbacks, they’re stronger than you may think. Original edition comic books, music magazines (think Billboard and Cashbox) and dictionaries have held up for decades even though they’re bound using this method and handled frequently.
Perfect bindings also offer something no other binding style can: an option that isn’t necessarily intended to last a lifetime. This may sound counterintuitive, but hear me out.
Not all books are created to outlast us. Workbooks, notepads and even some notebooks are intended to serve, not last. When we need a quick, affordable option, the perfect binding is an obvious choice.
Basic steps for any Perfect binding
There are 3 basic steps for any Perfect binding:
- Creating the book block,
- Applying adhesive,
- Adding the cover
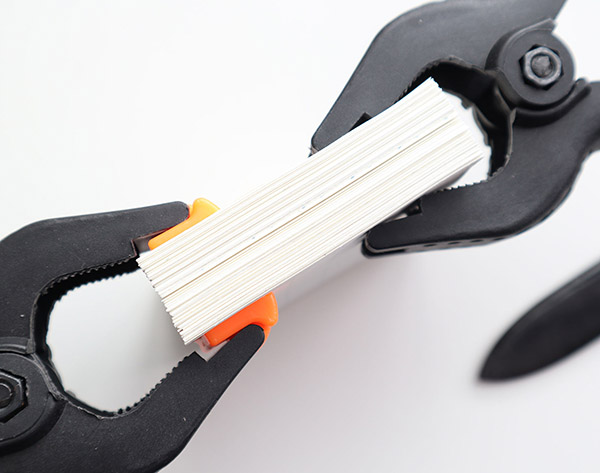
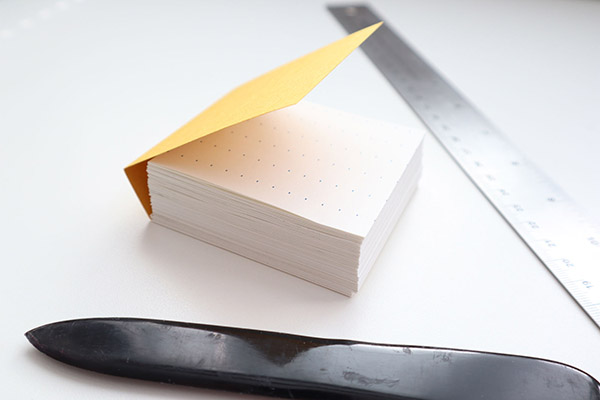
Step 1: Creating the book block
To create the book block, gather all pages flush at the spine and secure using a clamp. Cut the spine edge square using a guillotine or manual knife. The book block is now ready for adhesive.
Quick tip: Use a ream cutter or guillotine to square up book blocks with a thicker spine.
Step 2: Applying adhesive
PVA (polyvinyl acetate) is an adhesive in the bookbinding space known for its strength and durability while drying clear and flexible. PVA is the best option for DIY and hobby book makers, but if you don’t have PVA, it’s safe to use Elmer’s glue instead.
With the book block still clamped at the spine, begin applying adhesive using a paste brush. Move from the middle to each outer edge, using care to spread the glue evenly. After the first application, let it dry for 5-10 minutes. Apply at least 2-3 more coats for spine thicknesses up to 25mm (1 inch). Apply 4-5 additional coats for spines from 25mm to 50mm in thickness. If the spine of the book is wider than 50mm, consider using more layers and a stronger adhesive.
Remember, glue used at the spine requires us to respect grain direction. This is true for the perfect binding as well as many other methods (like the case binding, for example). If grain direction is not respected, the perfect binding will buckle at the spine and its lifetime will be greatly reduced.
Quick tips:
- Vice grips and metal clamps are great for holding the book block in place while applying adhesive
- Each layer of adhesive requires a longer dry time, so having a small fan nearby can be helpful
- Wood glue is another great option if PVA and/or Elmer’s glue are not available
- Thermal glue is often used in the commercial space, but can also be used at home

Step 3: Adding the cover
Once the final layer of glue has been applied, it’s time to add the cover. The perfect binding cover is usually made of heavier card stock or paper and can sometimes have a satin, glossy or textured finish on one side. Lines are scored on either side of the spine, making it easy to bend the covers into position.
To apply the cover, press the untreated spine of the card stock evenly against the still-wet glue of the book block. After 1-2 minutes, remove the clamps. Fold at the pre-scored lines to allow the front and back covers to fall in place.
With the cover in position, apply even pressure across the entire surface using weight or a book press. This will make sure the covers dry flat in position. If there isn’t enough pressure, the covers may flap open like bird wings.
Quick tips:
- Choose a heavy paper between 80 and 100lb (Kraft stock is also an excellent option)
- Textured cover stocks (like linen) are nice to the touch and add character
- Add glossy UV or other laminate to your cover for strength and durability
- Use several books slightly larger than the one you’re making in place of a book press
More bookbinding goodness
✨ What tools do I need to get started bookbinding?
- Bookbinding Tools & Supplies Quick Start Guide – learn all about book making tools, which to buy first & where to go online
- Pick up my popular Complete Starter Bookbinding Tools Kit – all the bookbinding essentials in one spot
🌟 Looking for a simple way to start making books?
Try a Complete Book Materials Kit. Each one has everything you need (+ tutorials & videos) to make a beautiful book without all the fuss.
Thank you for taking me along on your book making journey!
Misty


