
A great way to get started with bookbinding is to learn the basic parts of a book. If you were to strip away the content from any book, you would find these features. It’s comforting (for me) because it’s almost like a universal language all bookbinders understand and build from.
What is a book?
Before diving into the basic parts, it’s probably a good idea to understand what a book is in the first place.
By definition, a book is:
a written or printed work consisting of pages glued or sewn together along one side and bound in covers. Also referred to as a “codex.”
To a bookbinder, a book is often more than that. While there is a standard definition of what a book is, there is the abstract definition of what a book means to each of us.
For some, a book is a work of art created to tell a story. For others, it’s a statement revealing something about who we are. For you, the definition may be different. It will reveal itself over time with every improved skill and piece you create.
With a common definition under our belt, we’re ready to jump into some terminology.
Terms to Know
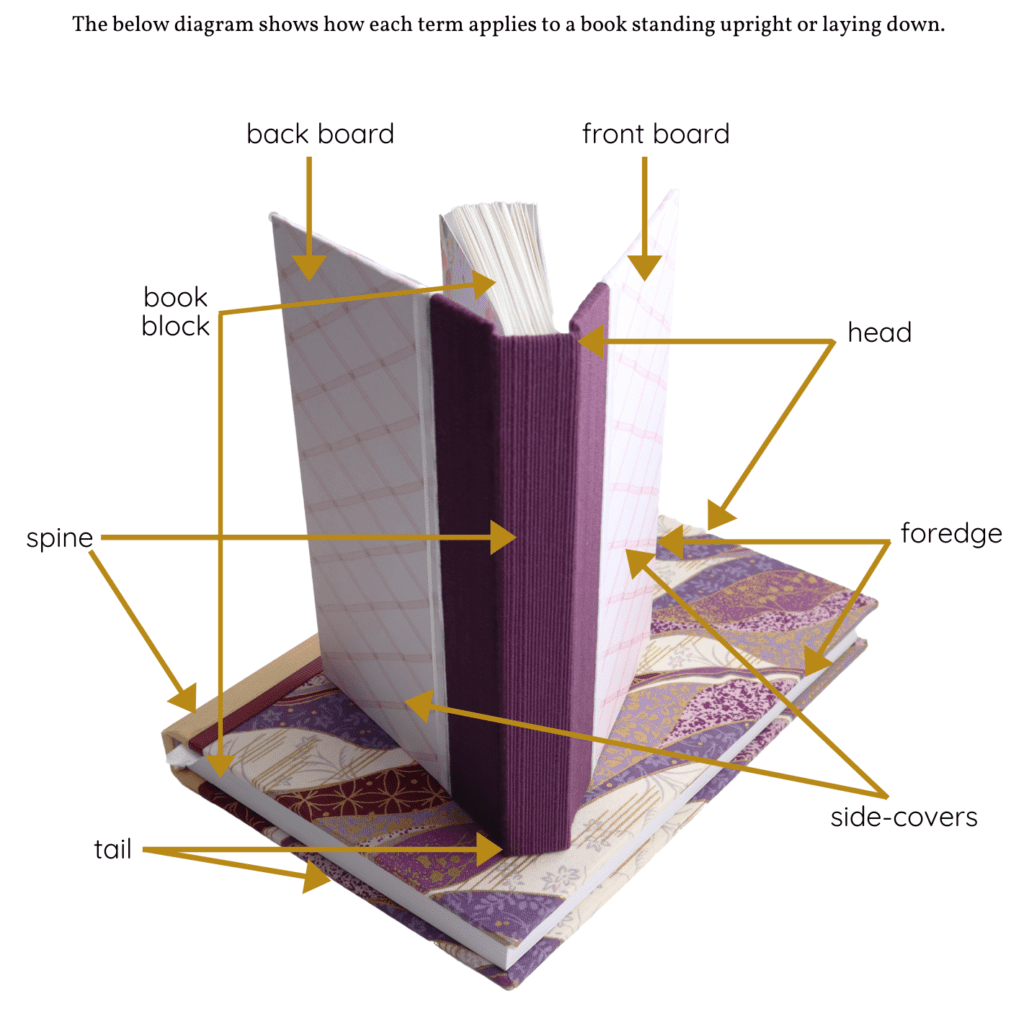
As a teacher, I prefer to skip the jargon and use common words. For the sake of introduction, though, I would like to stick to the established vocabulary of bookbinders when describing these fundamental parts of a book. Please note, I will use “book” and “codex” interchangeably just to help you become familiar with both ?
| front board | The front cover of a codex, typically a cardboard base from 0.060 – 0.100 mm thickness. |
| back board | The back cover of a codex, always the same thickness as the front board. |
| foredge | The front edge of a codex. |
| book block | The total of all signatures, sections, folios or sheets making up the body of a codex. Also sometimes referred to as the “text block.” |
| head | The top of a codex when standing upright. |
| tail | The bottom of a codex when standing upright. |
| spine | The “backbone” of the book connecting the two side-covers. |
| side-cover | Front and back covers of a book. Side-covers are created when a material is placed over the front and back boards. |
Reference Diagram
I’ve purposely placed one book standing upright on top of another laying flat. I did this is to show you how the terms above are used to reflect a book’s structure regardless of orientation. For example, the “front” is always the front, whether the work is standing upright or flipped upside down.
Resources
I’ve created a print-quality PDF of everything in this blog post to support your learning journey. If you would like to download it, you can snag it below!
So, how did you do? What did you think? Hop over to Instagram and let me know if you appreciated this resource or would like to know more. I’m always interested in understanding how I can better share my knowledge with those who want to learn! Remember, you don’t need formal training to become a bookbinder. Curiosity is the only talent required! ?
ALL my best,
Misty

